Wow! How time flies! Christmas was only a few months ago and now we are already in the fourth month of the year 2017 and of course we are now looking forward to another huge celebration – Easter!
During this period, crafts are made out of plastic, paper and of course candy!
Have you considered making crafts from something really special that would not harm the environment?
My kids love hunting for Easter eggs. Hunting for Easter eggs has been part of our family tradition for so many years.
The kids get up on Easter morning and look all around the house for Easter eggs. Fun stuff!
One thing we are changing this year….
Okay confession time! We have been reusing the same plastic eggs since forever and now we’re down to none! You guessed right… the plastics kept breaking one after the other due to wear and tear.
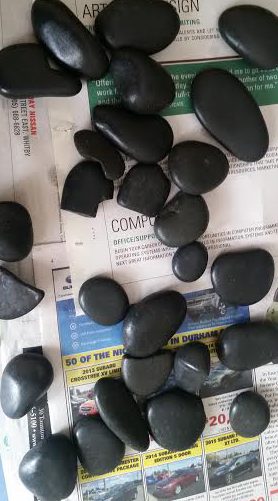
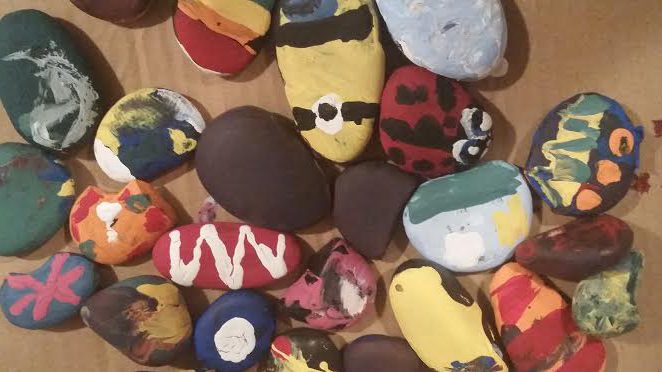
This year, we are determined not to purchase plastic eggs; rather we came up with fun craft ideas for Easter. We colored river rocks in preparation for Easter hunt this year.
Fun river rocks
Ever tried painting on little stones? I never tried it until now and I have to say we all loved it. I mean – what’s not to love about this?
The interesting thing about this is that you can be lucky to buy these from the dollar store.
You can also buy them from craft stores. Stones are relatively cheap. You can even get them for free!
Things you need
-River rocks
-Non-toxic paint (different colors)
-Paint Brushes
-Old newspaper (to cover the work area)
-Old containers for mixing and pouring the amount you need
-Pencil, chalk or sharpie marker (for outline)
Useful Tips
Keep these tips in mind when painting your stones!!!
- Cover the work area
Newspaper: cover the table you would be working on with newspaper or any other type of paper you already have.
2. Smooth rocks:
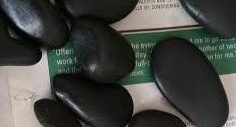
Smooth river rocks are ideal because they make the painting flow easily. If you have smooth stones in your garden like I do, then you’re in luck! Pick them up and get ready for your craft.
Smooth stones can also be found along a river bank or beach. If you’re going to pick stones from such spots, make sure it is okay to do so. Alternatively, you can purchase them from Michaels or Amazon.
3. Non- toxic Paint:
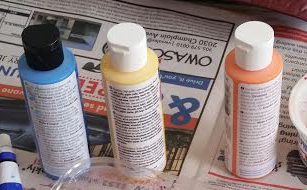
If the kids are going to help with the painting, it is safer to buy non-toxic paint. Buy the colors you would need. Some paint colors come in a pack while some are sold individually.
4. Primary colors
If you’re going to buy paint bottles that are sold individually, you can buy primary colors – red, yellow and blue and then make other colors by mixing portions of these colors together. Huge savings here!
5. Wash and dry the rocks
If you picked up your rocks from the park or beach, wash them with soap and let them dry before you start. if the rocks are new, you can skip this step.
6. Discuss
If you are painting with other people, it is nice to have a chat with them. Share ideas and see if you want to go with a particular theme for your rocks – animal theme, flower theme or everyone may decide to just do freestyle painting.
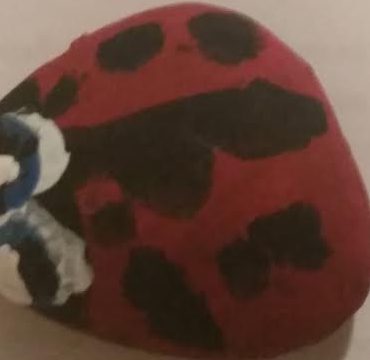
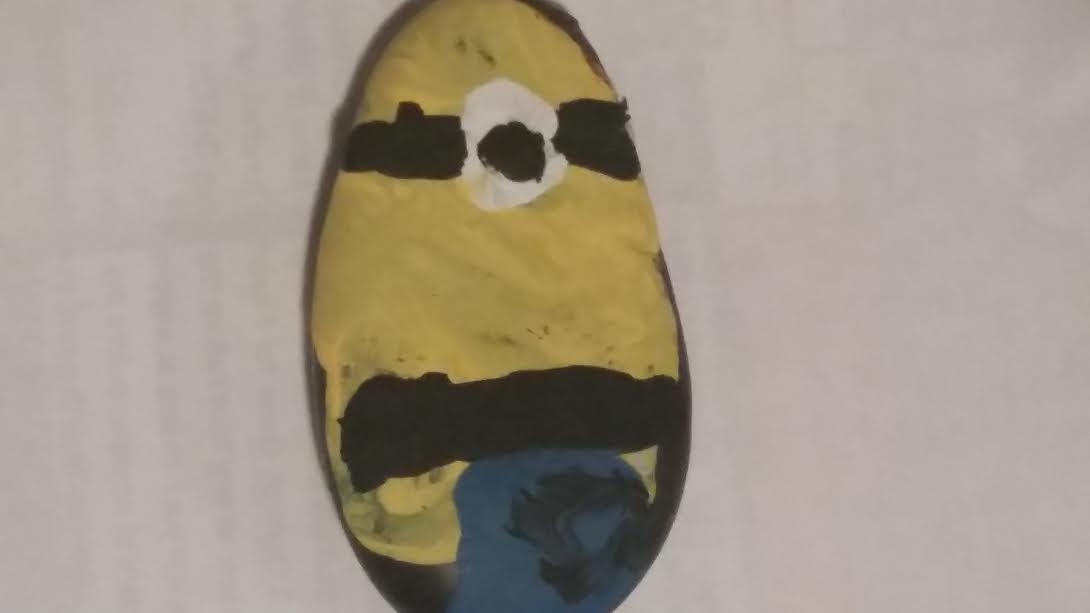
In our own case, we came up with several ideas – lady bug, minion, nature, little dots, stripes, zig zag… so we designed the rocks based on these ideas.
So you see…the possibilities are endless so why not have fun!!!
7. Practice
Practice on paper before designing the stone. You can use a chalk, pencil or sharpie marker to draw the outline of the object. This will make painting easier but you can skip this step if you’re a pro or if you are just comfortable with painting.
8. Paint brushes:
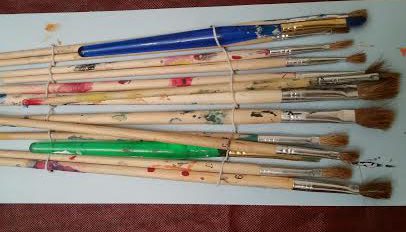
You can buy a pack of paint brushes (wide brushes and pointed brushes are really the types you need) from the dollar store. No need to buy expensive brushes. You would definitely need different sizes; so ensure you have about 5 or more depending on the design you come up with.
9. Paint areas of great detail before painting areas with less detail
When we started designing our stones, we quickly learnt that it was easier to start from the largest part of the painting like the body of the lady bug in our own case, to the least part such as the eyes.
10. Be patient
You may have to wait for certain sections to dry up before applying another color.
Here is our colored rock collection!
Ladybug – to paint the lady bug rock, the first thing was to color the entire rock ‘red’. Then let it dry and then we used a thin brush to apply the black dots and black line right in the middle of the stone. Let it dry again, then we made two white dots, let dry and then we made the 2 blue circles, let dry one last time and we made two black dots on the blue circles – for the eyes.
Painting the minion
First, we painted the stone yellow. Left it for a few minutes to dry, then we made 2 black lines with black paint, one at the top and one at the bottom.
We placed a white dot at the center and then we placed a black dot when the white paint was dry.
We also added a dash of blue paint at the bottom of the rock.
River Rock Uses
Coloring river rocks is a fun easter craft for kids. Even the whole family can do this together!
There are so many fun stuffs you can do with rocks asides the kids hunting for them on Easter morning:
- Beautify your garden
- Beautify your center table
- Make craft with your kids inside or outside your home.
- Sell what you have created. Websites like Etsy can buy your colored rocks if you’re really good at decorating them.
- Design them and give them to a friend or relative as a special gift.
Now…if you’re really thinking of coloring Easter ‘eggs’ for easter, some stores do carry wooden eggs which are a great alternative to plastic eggs. Get creative and have fun!
I hope you enjoyed my post. Please leave a comment. If you have other ideas I would love to hear from you. Thank you dear friends.
The preschool where I ‘m teaching has been into rock painting activities since last school year, the children love it. We even made an exhibit of what the kids have made with it. I love this idea of using rocks as easter eggs instead of the plastic ones, I will suggest this to my co-teachers.
Hi, I’m glad you found his post helpful. Rocks and even wooden eggs are better for the environment. Keep up the good work by spreading the word. Thanks for stopping by.